Calculator With Devops Tool Chain
DockerHub Profile: https://hub.docker.com/r/pilaniya1337/calculator
GitHub Profile:https://github.com/mukeshpilaniya/calculator
Required Tools: -
- Git (source code management)
- Docker (container node)
- Eclipse /IntelliJ (Project IDE)
- Jenkins (Continuous Integration: git, Continuous testing: Junit)
- Maven (Continuous Build)
- Rundeck (continuous deployment)
- ELK (elastic search, Logstash, Kibana: continuous monitoring)
Installing Git: -
sudo apt-get install git
Installing Docker: -
sudo apt-get update
sudo apt install apt-transport-https ca-certificates curl software-properties-common
curl -fsSL https://download.docker.com/linux/ubuntu/gpg | sudo apt-key add
sudo add-apt-repository "deb [arch=amd64] https://download.docker.com/linux/ubuntu bionic stable"
sudo apt update
sudo apt install docker-ce
sudo usermod -aG docker ${USER}
Installing Eclipse IDE:- https://www.eclipse.org/downloads/
Installing Jenkins: -
- Download the war file
http://mirrors.jenkins.io/war-stable/latest/jenkins.war - Run the war file
java -jar jenkins.war - Got to url http://localhost:8080
Jenkins Plugins: -
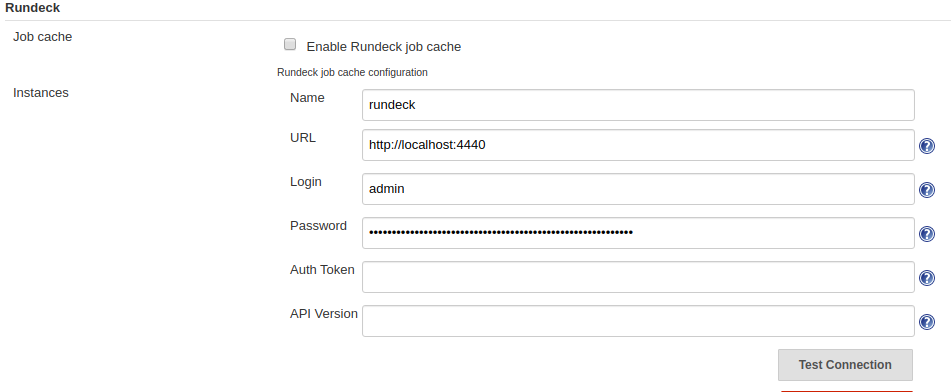
- Rundeck plugin
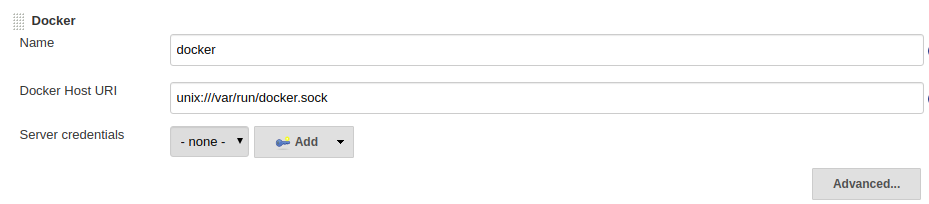
- Docker plugin
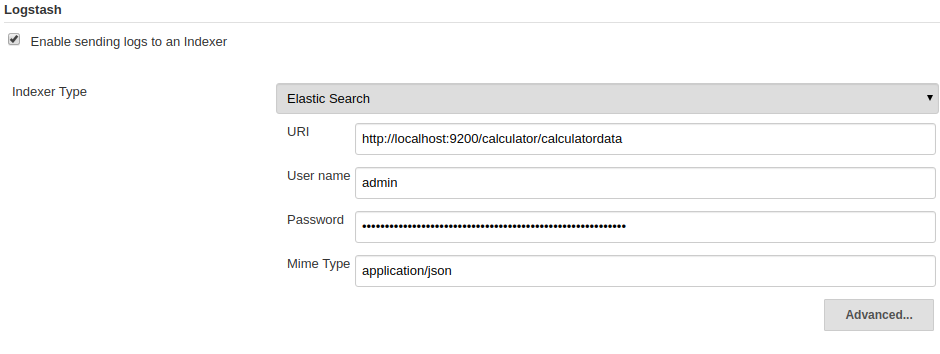
- Logstash plugin
Configure plugin:-
Logstash plugin automatically create calculator index in elasticsearch
Installing Maven: -
 sudo apt install maven
 mvn -version
Installing Rundeck: -
- Download rundeck from
https://download.rundeck.org/deb/rundeck_3.2.6.20200427-1_all.deb - install using dpkg
dpkg -i rundeck\_3.2.6.20200427-1\_all.deb - Rundeck start and stop command
sudo service rundeckd start
sudo service rundeckd stop - Default address, username, password
Default address: http://localhost:4440
default username and password: admin - Allow rundeck to execute sudo commands on system terminal without password enter super user mode
- open file visudo
sudo visudo - Add following lines at end of the file
rundeck ALL=(ALL) NOPASSWD: ALL
Localhost ALL=(ALL) NOPASSWD: ALL
- open file visudo
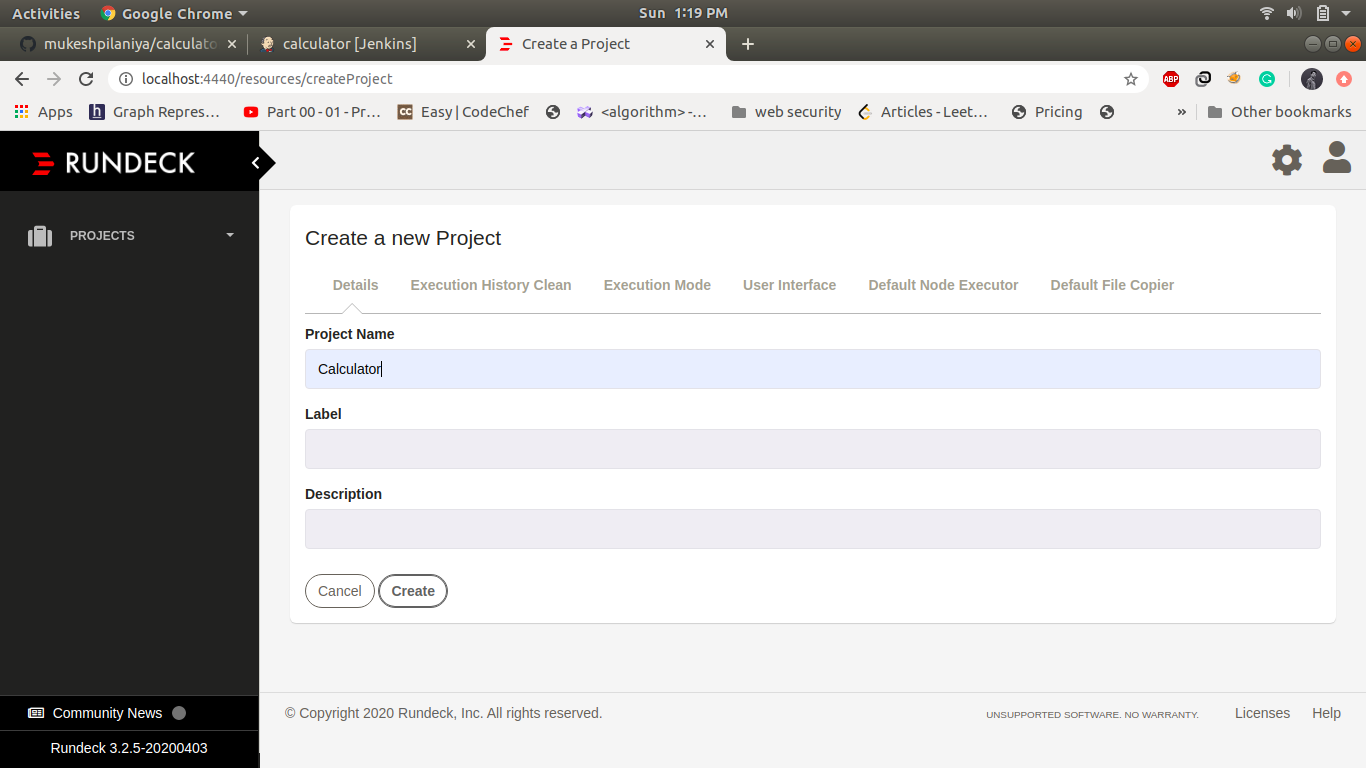
Create a new Project and job in Rundeck:-
-
Go to the url http://localhost:4440 and create a new project name as calculator and save it.
-
Create a new job in the same project, enter jobname and job group
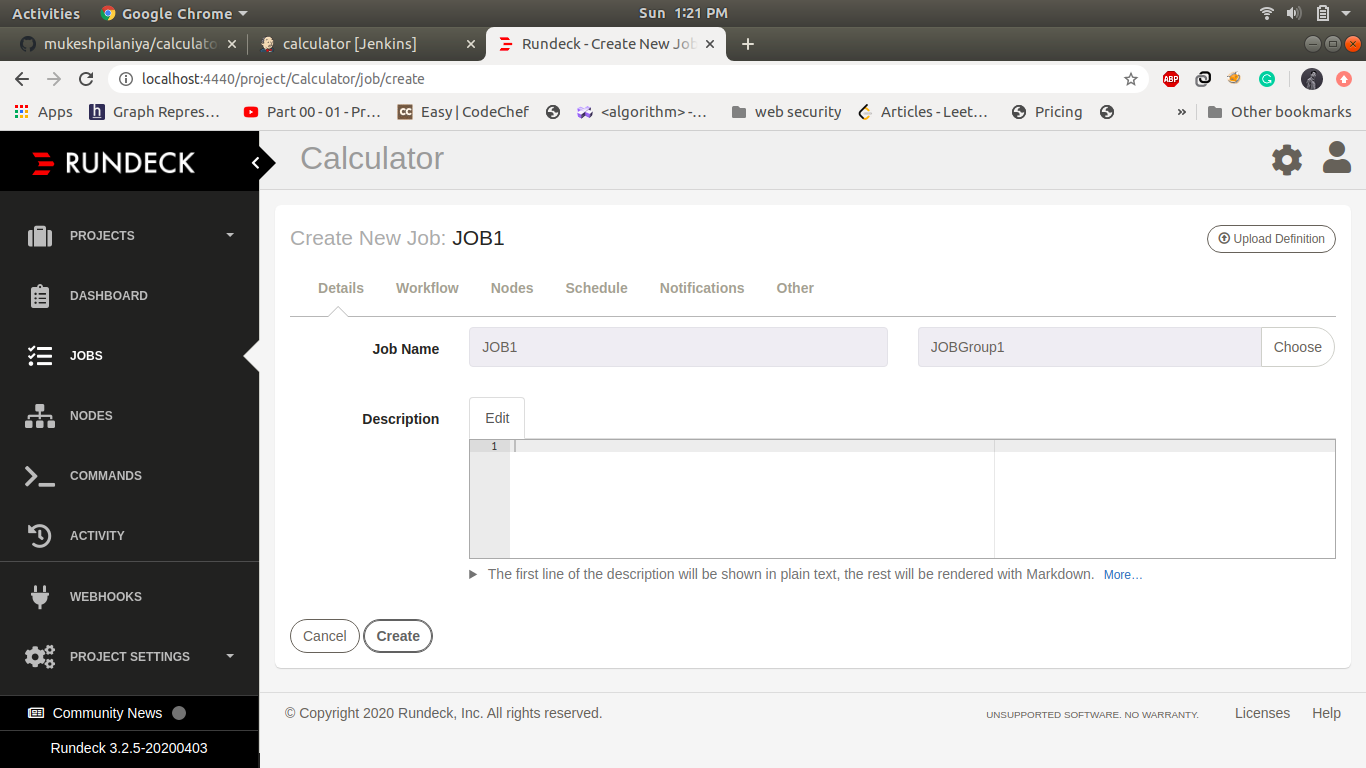
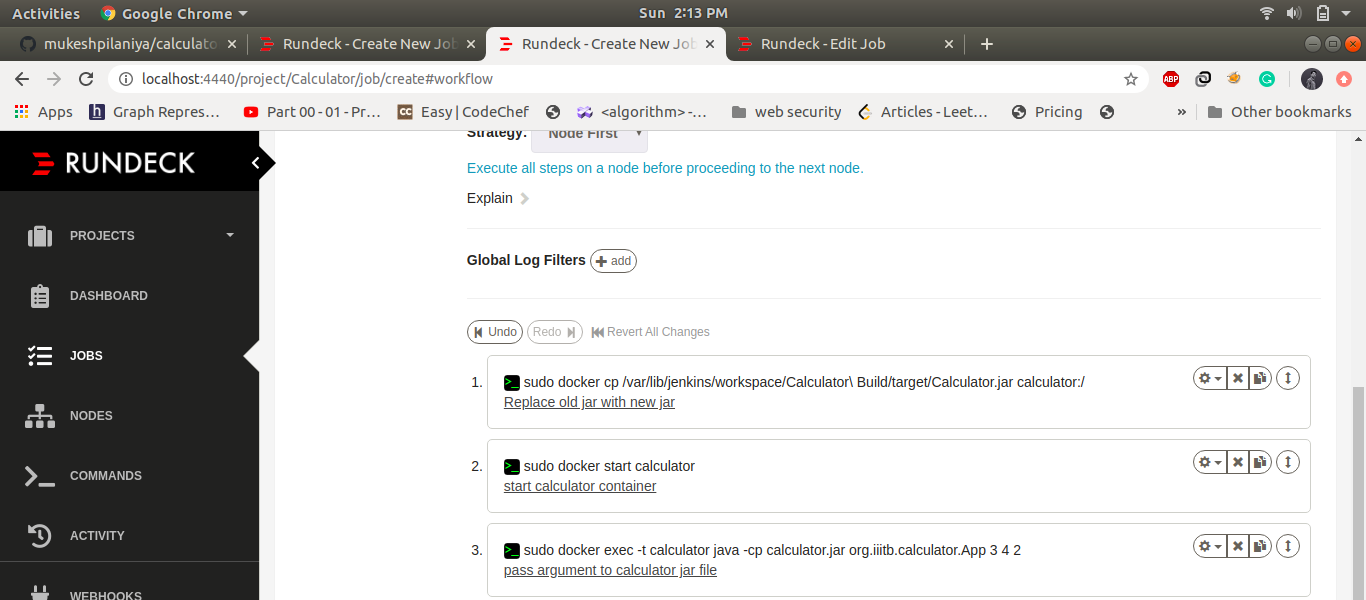
- Navigate to workflow section and add the following commands to execute on registered node
- command 1 to replace old jar file with new jar file
sudo docker cp /var/lib/jenkins/workspace/Calculator\ Build/target/Calculator.jar calculator:/ - Command 2 to start calculator container
sudo docker start calculator - Command 3 to pass argument to calculator jar file
sudo docker exec -t calculator java -cp calculator.jar org.iiitb.calculator.App 3 4 2
- command 1 to replace old jar file with new jar file
-
Under Nodes select execute locally because all these commands will be executed on the local system.
- Make note of UUID for future reference and save the job.

ELK Installing: -
Step 1 installing elasticsearch: -
- Set java 8 as default java versionAllow rundeck to execute sudo commands on system terminal without password
- enter super user mode
- open file visudo
sudo visudo - Add following lines at end of the file
rundeck ALL=(ALL) NOPASSWD: ALL
Localhost ALL=(ALL) NOPASSWD: ALL - download Elasticsearch followed by public signing key
sudo wget -qO - https://artifacts.elastic.co/GPG-KEY-elasticsearch | sudo apt-key add - - install the apt-transport-https package
sudo apt-get install apt-transport-https - Add the repository
echo "deb https://artifacts.elastic.co/packages/6.x/apt stable main" | sudo tee -a /etc/apt/sources.list.d/elastic-6.x.list - Update the repo list and install the package
sudo apt-get update
sudo apt-get install elasticsearch - Update the repo list and install the package
sudo vim /etc/elasticsearch/elasticsearch.yml - Uncomment "network.host" and "http.port". Following configuration should be added
network.host: localhost
http.port: 9200 - Start ElasticSearch
sudo systemctl start elasticsearch.service
Step 2 installing kibana:-
- Let's start installing Kibana now and modify Kibana settings
sudo apt-get install kibana
sudo vim /etc/kibana/kibana.yml - Uncomment following lines:
server.port: 5601
server.host: "localhost"
elasticsearch.url: http://localhost:9200 - start Kibana service
sudo systemctl start kibana.service - Goto http://localhost:5601
Step 3 installing logstash: -
- sudo apt-get install logstash
- sudo service logstash start
- Got to http://localhost:4440
http://localhost:9200
SDLC: -
Development Phase: -
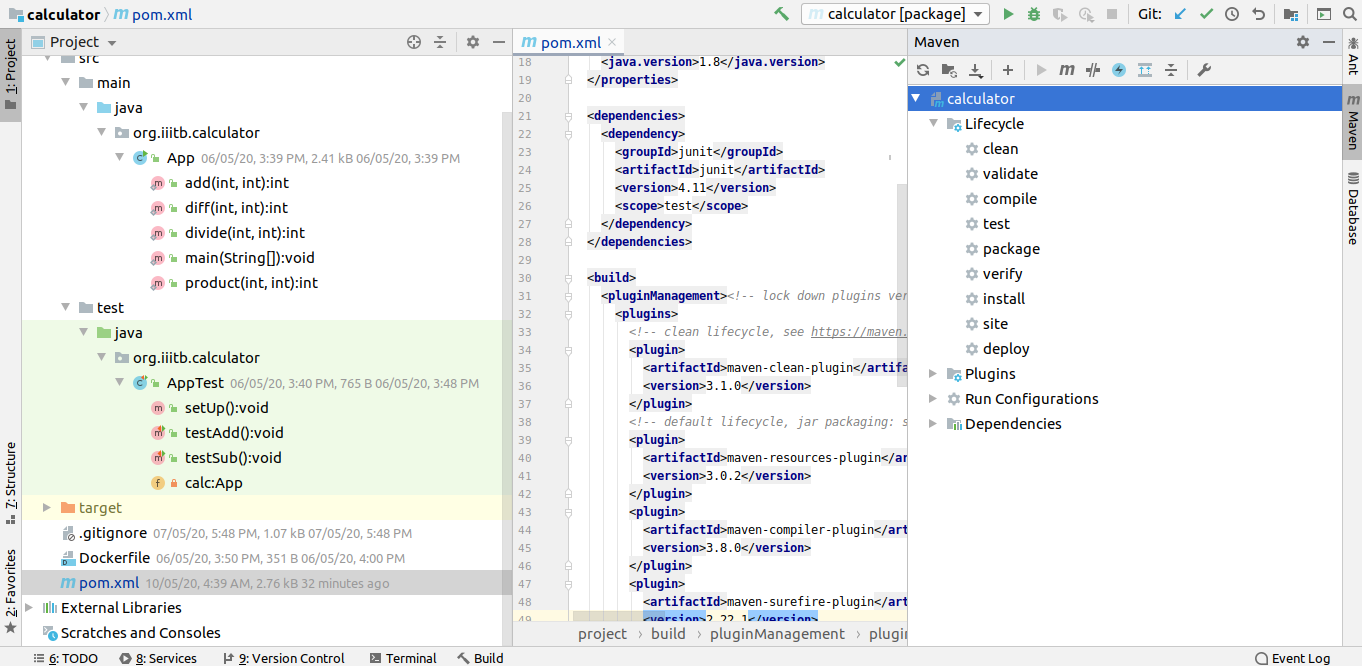
The development of this project is happened in java and it is a maven-based project. The src/main/java directory contains the project source code and the src/test/java directory contains the test cases like unit testing.
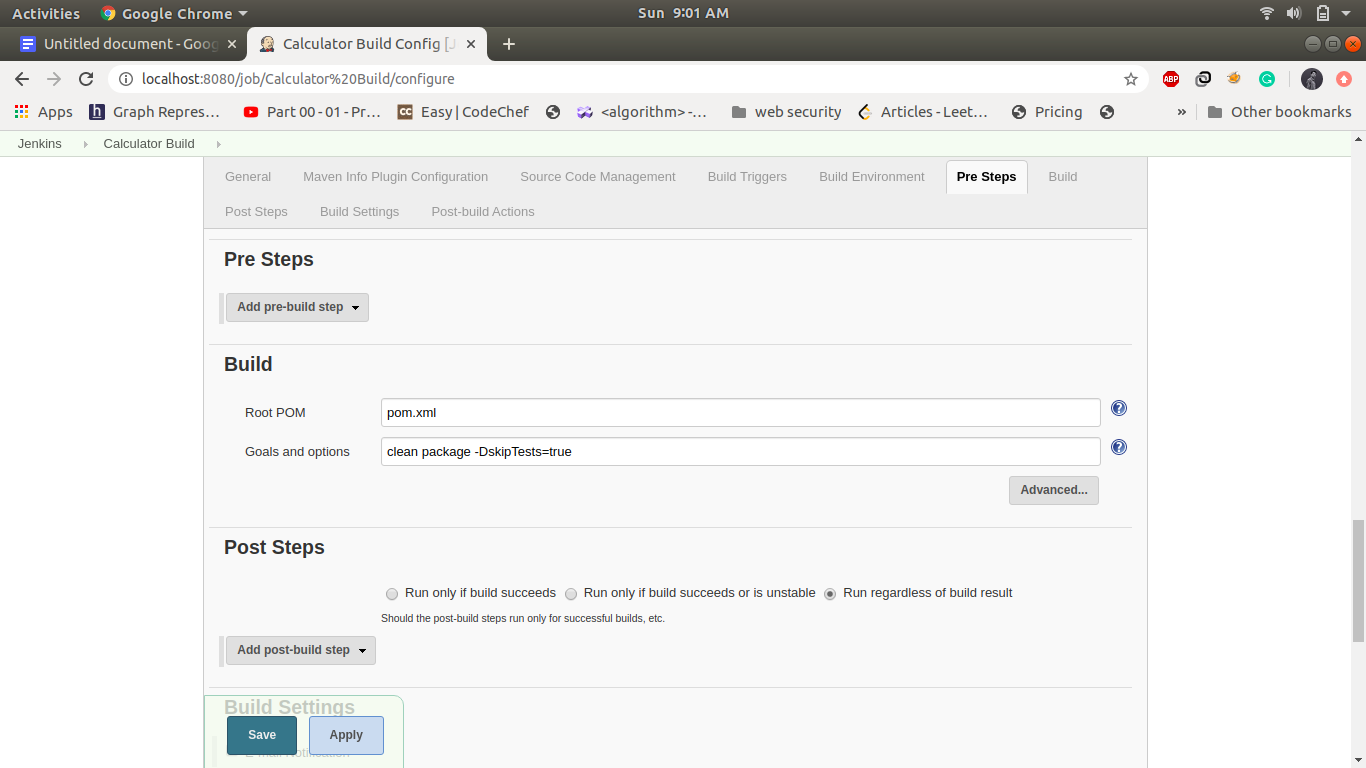
The next step is executing these commands: -
mvn clean - command attempt to clean target folder files that are generated during the build by maven
mvn package - command convert the entire maven project into an executable jar package
Pom xml file: -
To perform unit testing we have to add Junit dependency and maven-jar-plugin for creating a package. It will create a package with a name calculator.

After executing these commands, a target folder is generated automatically which contains our artifacts file calculator.jar. To test this artifact, copy this artifacts file and run the below command in the same directory.
java -cp calculator.jar org.iiitb.calculator.App
org.iiitb.calculator is a package name and App is a class name where calculator methods are defined.
Docker file: -
create a 'Dockerfile' under project level (at same level of pom.xml)
# Start with a base image containing Java runtime
FROM openjdk:8
# Add Maintainer Info
LABEL maintainer="github.com/mukeshpilaniya"
# Add a volume pointing to /tmp
EXPOSE 8080
# Add the application's jar to the container
ADD /target/calculator.jar calculator.jar
# Run the jar file
ENTRYPOINT ["java","-cp","calculator.jar","org.iiitb.calculator.App"]
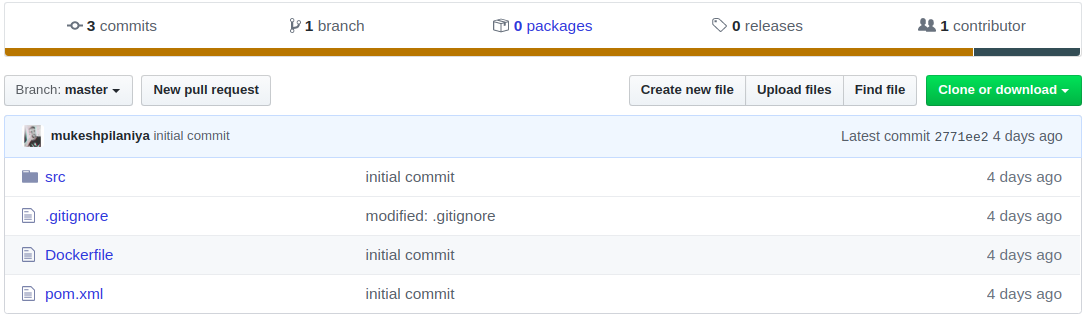
The next step is, create a repository(calculator) in github and push project code into calculator repository. The following set of commands will push the code into github repository.
git init
git remote add origin "https://github.com/mukeshpilaniya/calculator.git"
git add .
git commit -m "initial commit"
git push origin master.
Build a docker Image: -
Enter the following command in the terminal with the home directory of project
sudo docker build -t calculator\_image .
This command will create project specific docker image(calculator_image), now create a container of this image using the following command
sudo run --name calculator\_container -d calculator\_image
Software Development life cycle: -
The whole project is developed following the DevOps model and using various tools. The software development Life Cycle of this project includes six stages
- Source Control Management (git)
- Code Building (maven)
- Code testing (Junit)
- Build and Publish Docker image (Docker)
- Deploying (Rundeck)
- Monitoring (ELK)
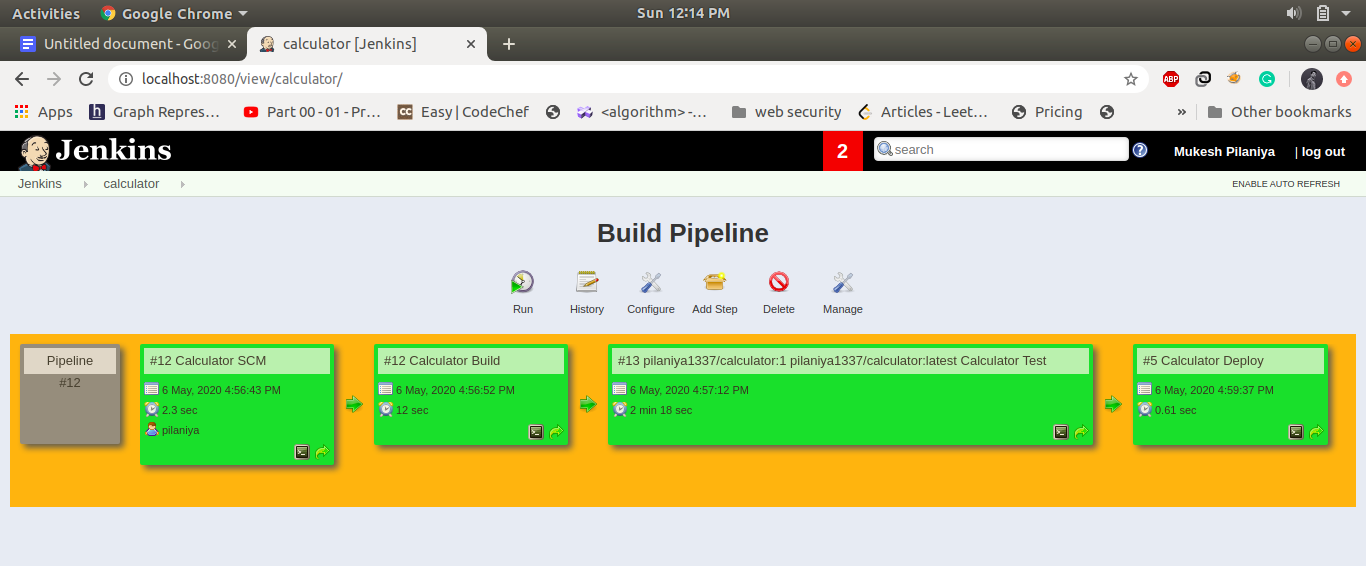
Setup jenkins Pipeline:
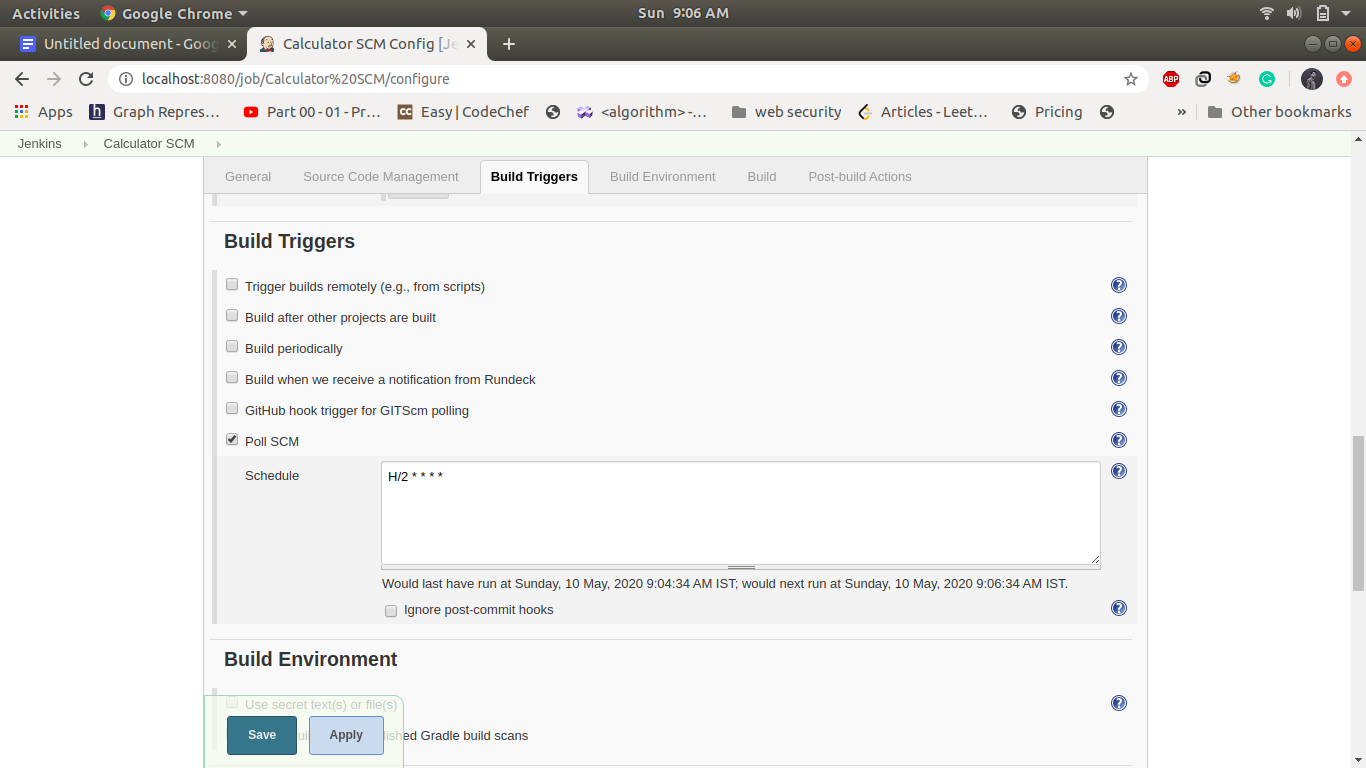
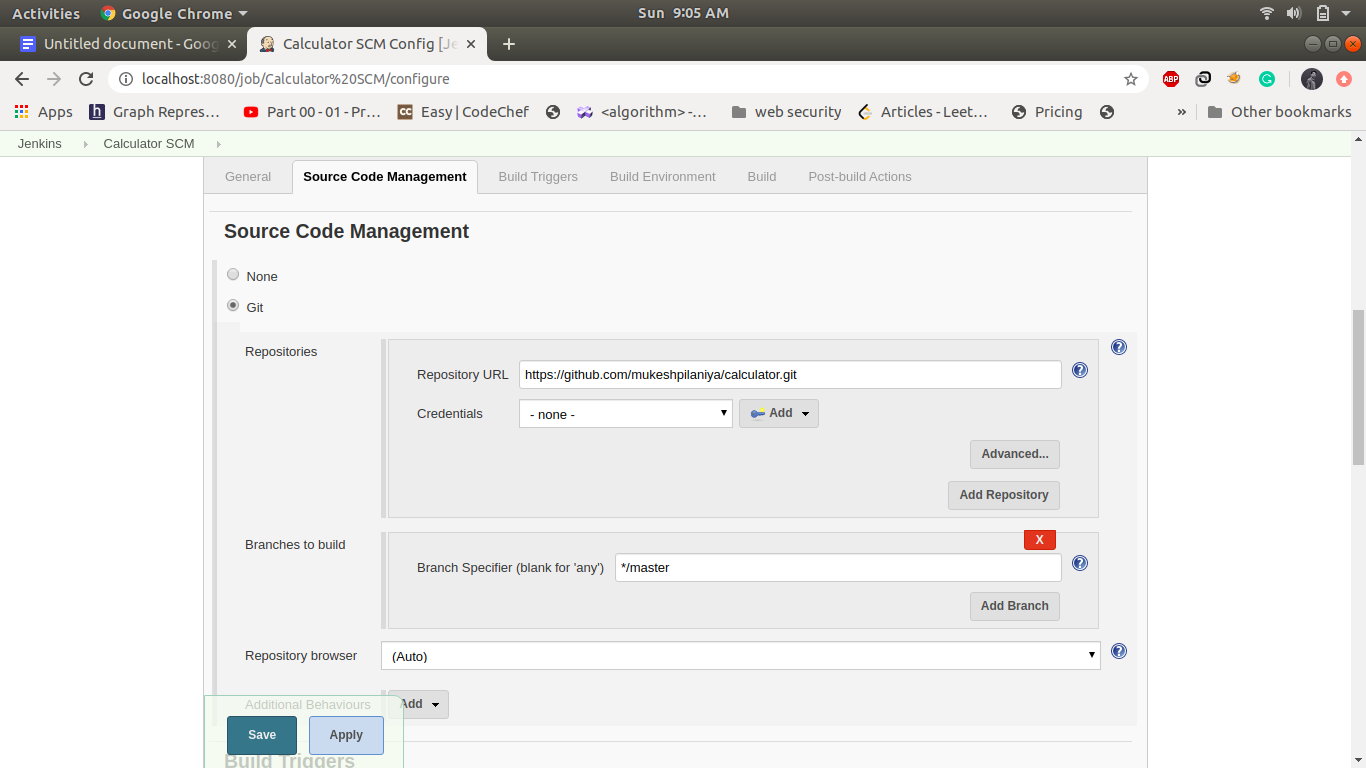
1. Job1: Calculator SCM:
SCM stands for source code management and used for managing the source code of the application, for this project source code is stored in a git repository hosted on GitHub at mukeshpilaniya/calculator. Here we are using pollSCM which checks the git repository after an interval and if there is a change in the code it triggers the pipeline otherwise it doesn't do anything.
Create a FreeStyle project names as calculator SCM and following is the configuration in this step
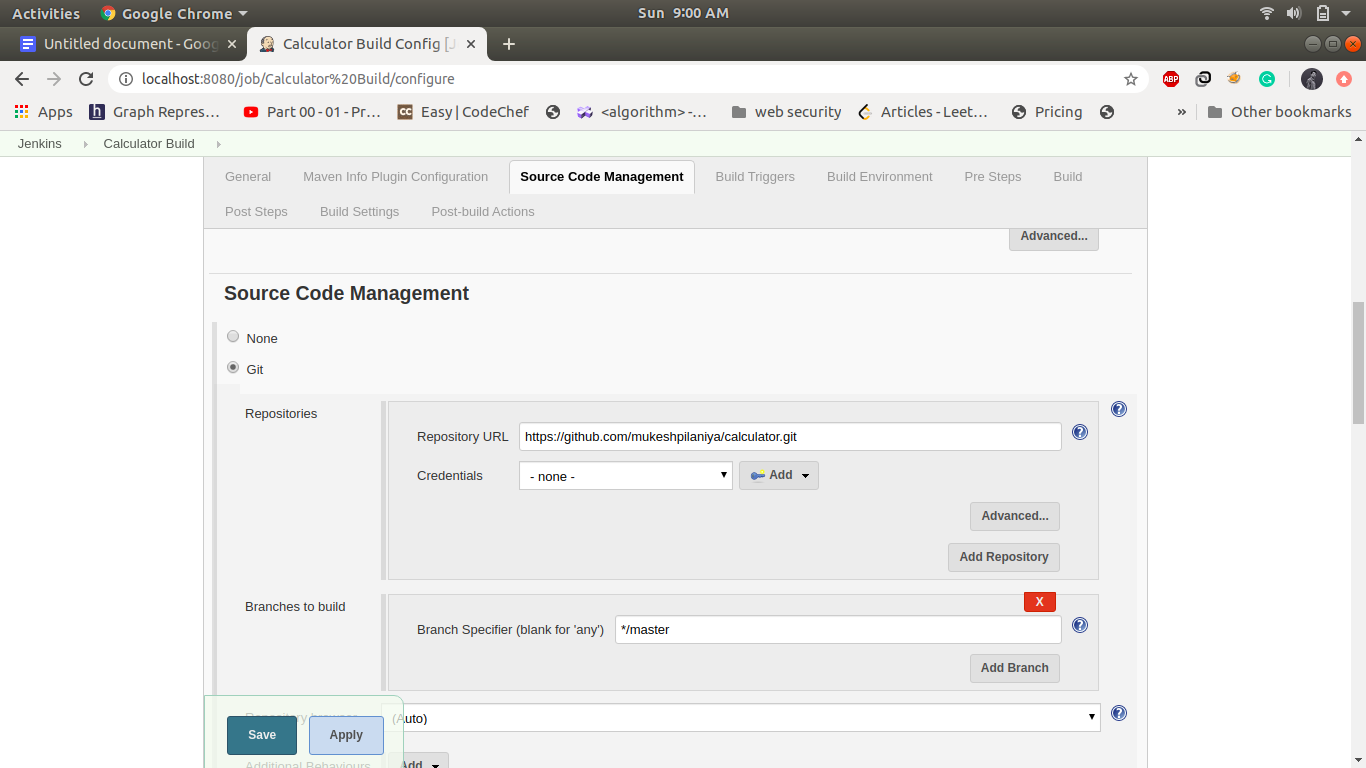
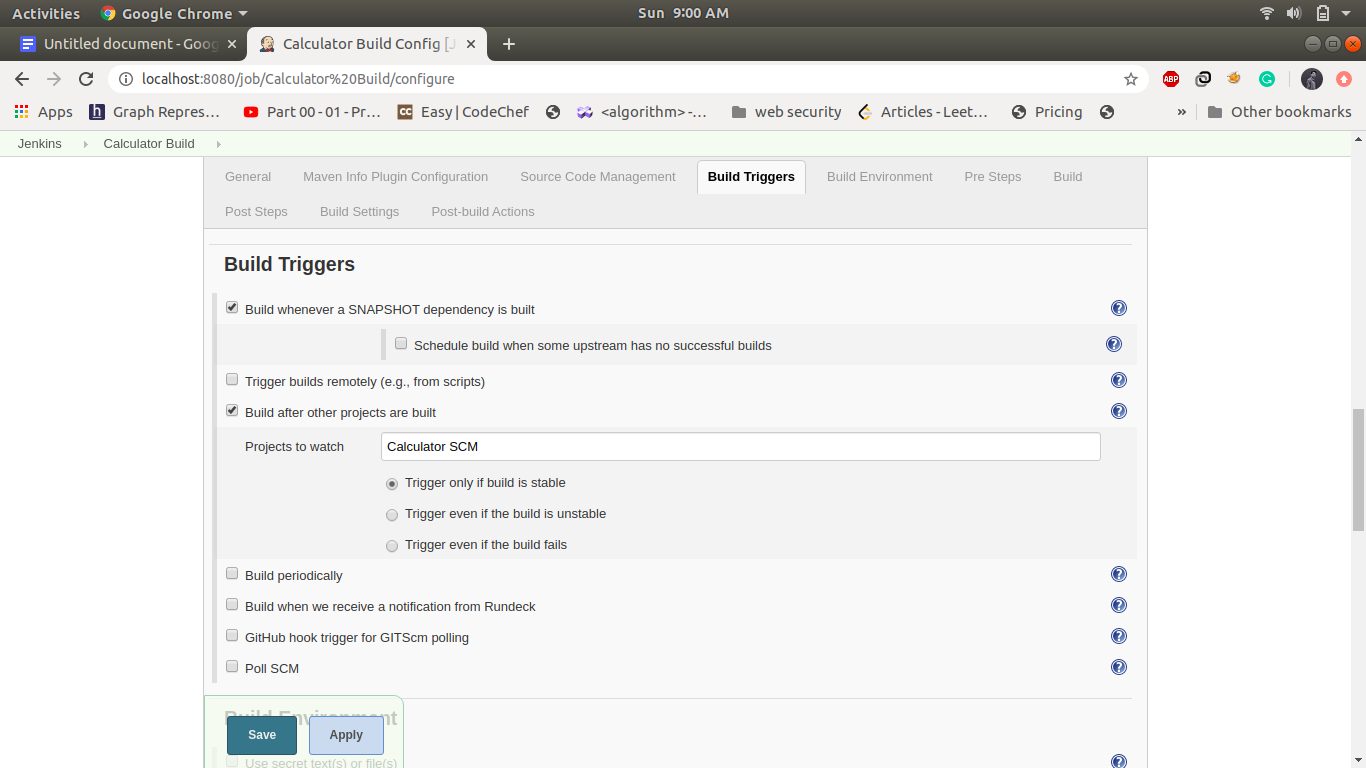
2. Job2: Calculator Build:
This step build triggers automatically when the first job is finished and it will build a jar file in the jenkins working directory if the build is successful it will automatically trigger the calculator Test job. Create a maven project name as calculator Build and following is the configuration in this step.
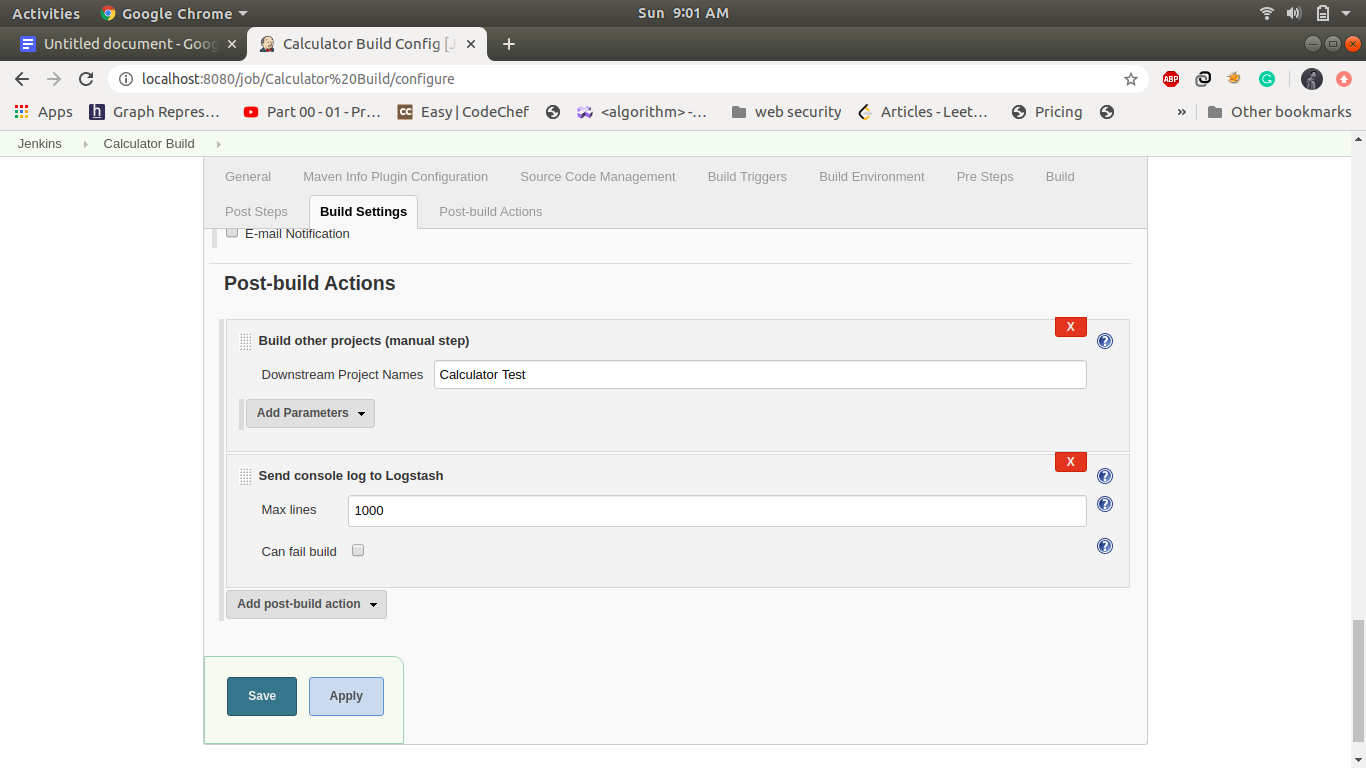
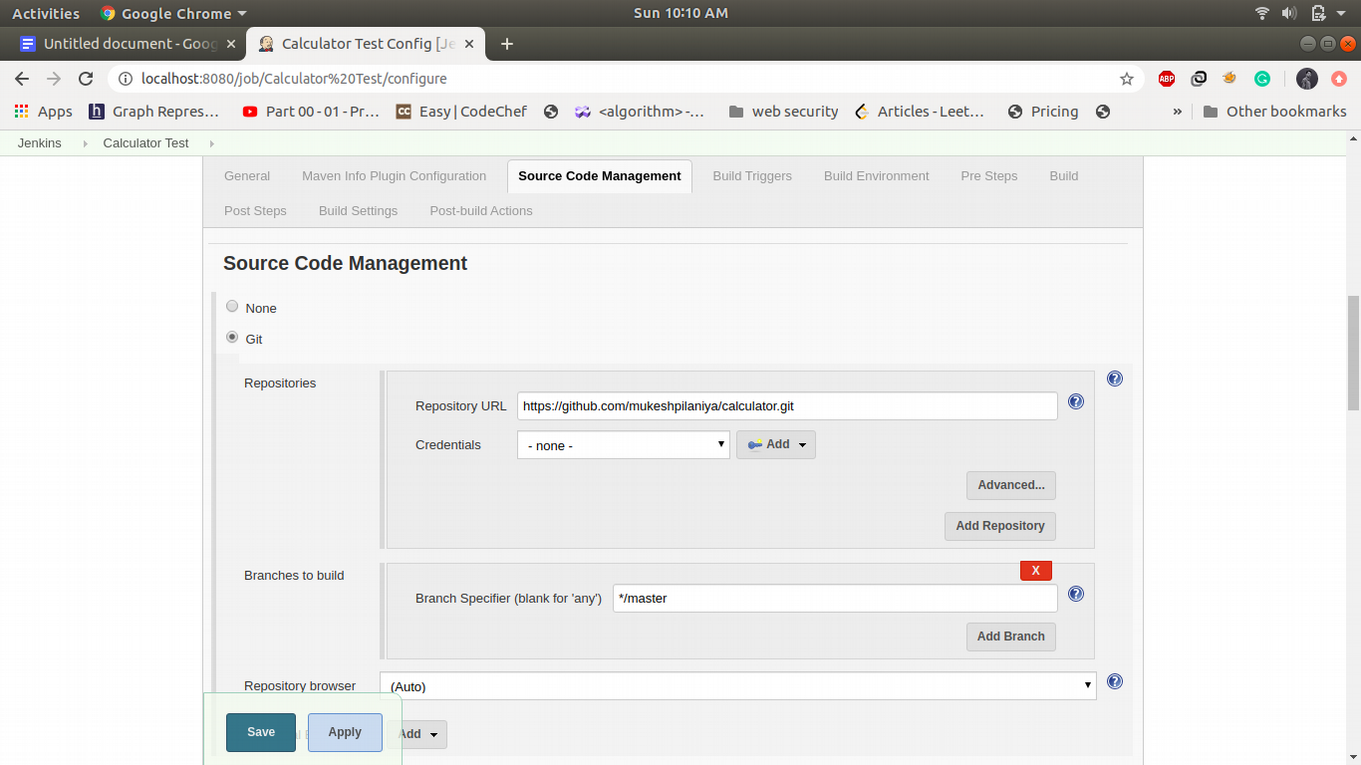
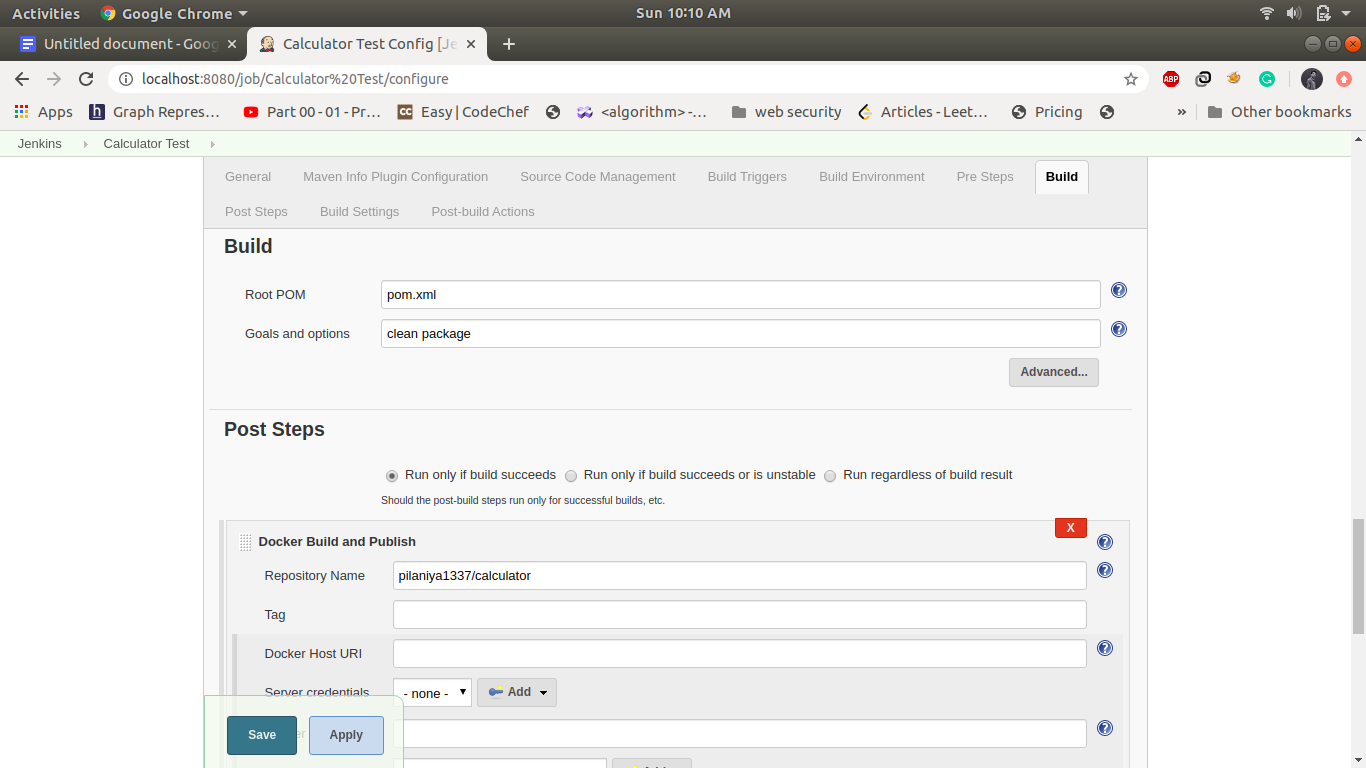
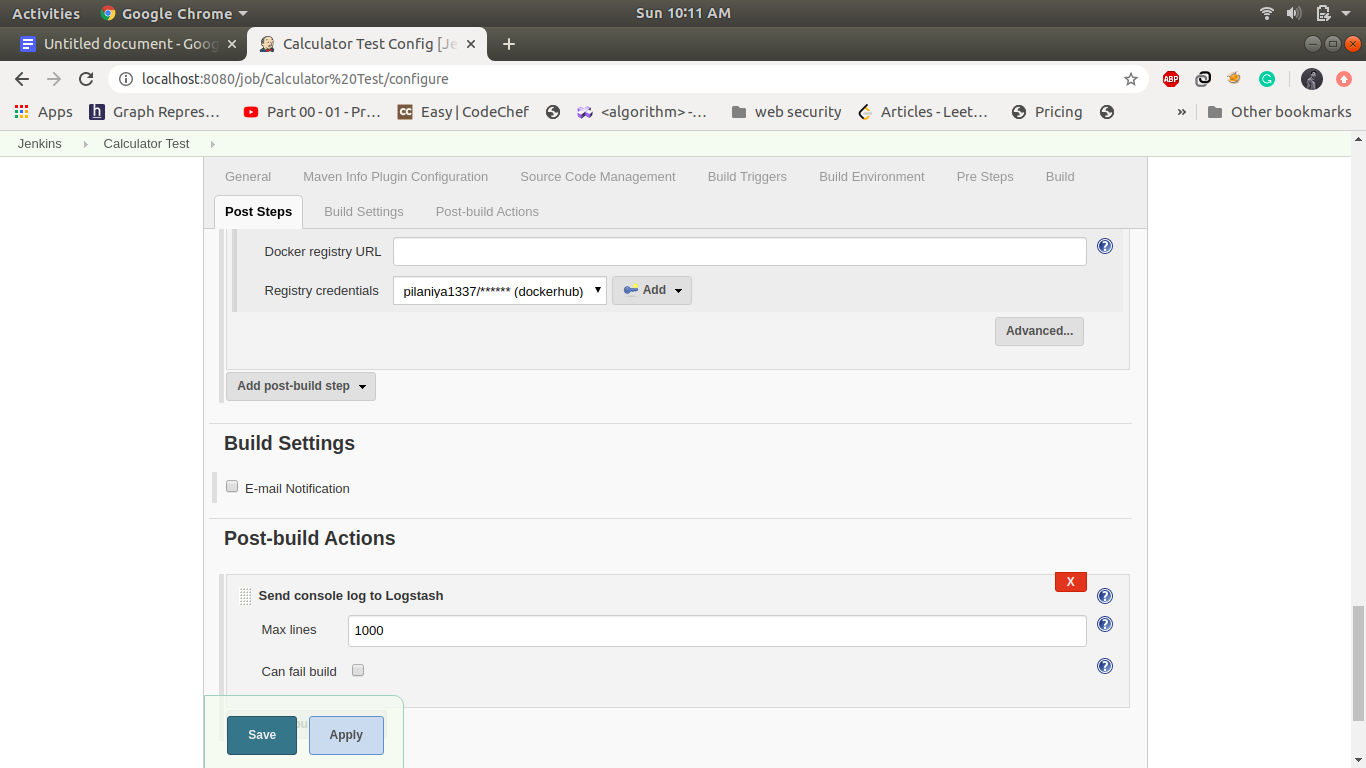
3. Job3: CalculatorTest: -
If the build is successful then the calculator test job will automatically be triggered. it will build the docker image and push it into dockerhub. This job will run test cases and send the control to the calculator deploy. Create a maven project name as calculator Test and Configuration of this step is as follows.
Create a Maven Project and name its calculator Test

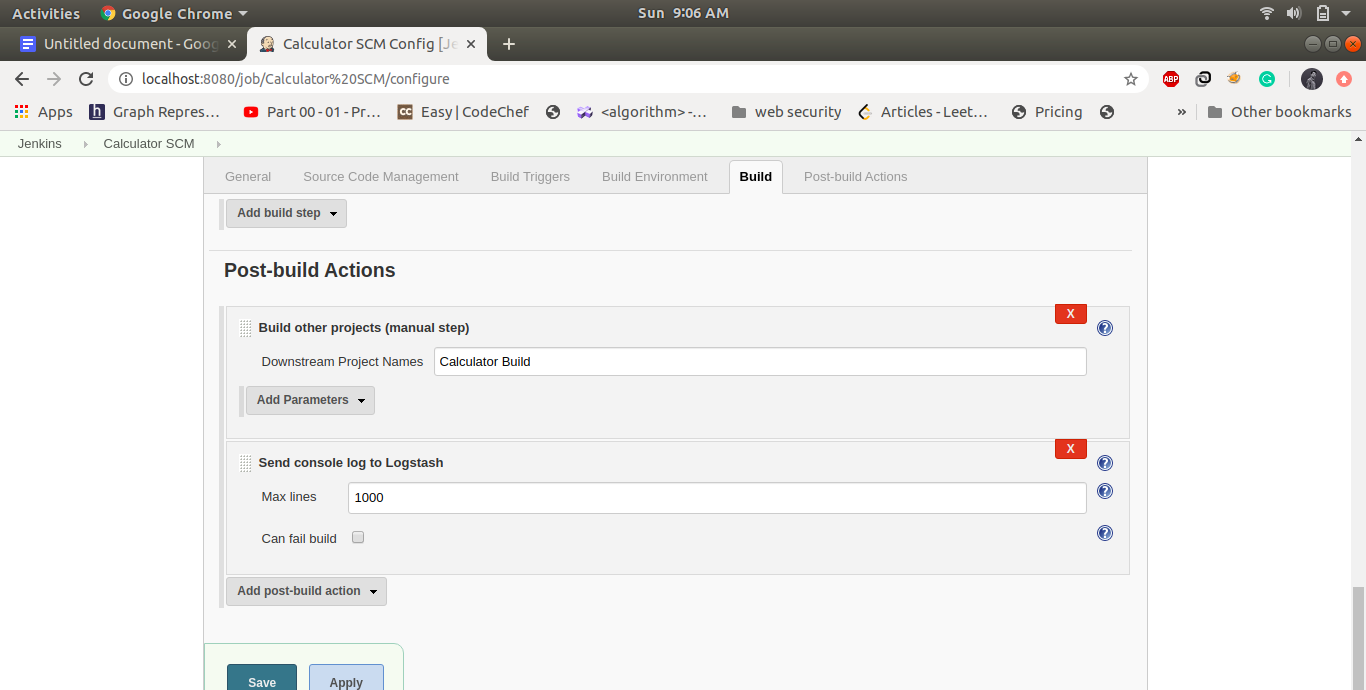
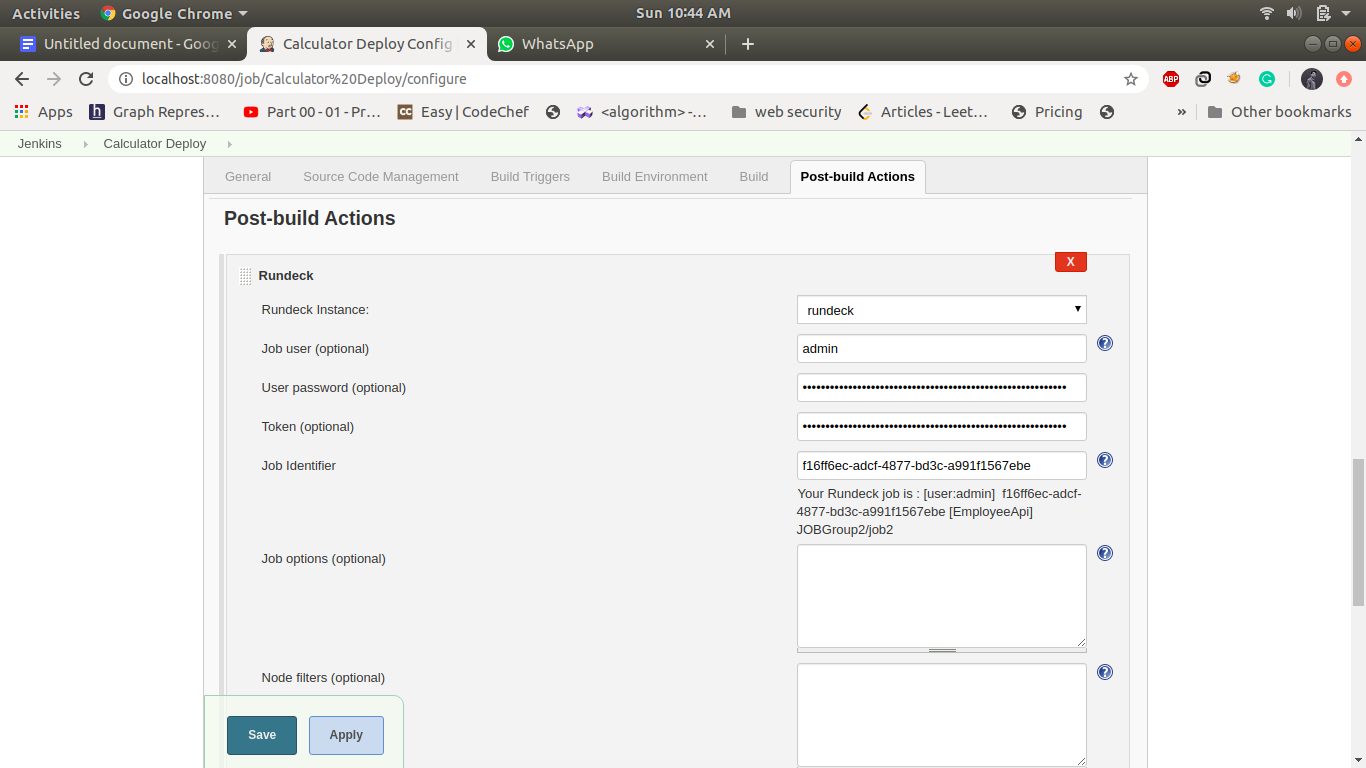
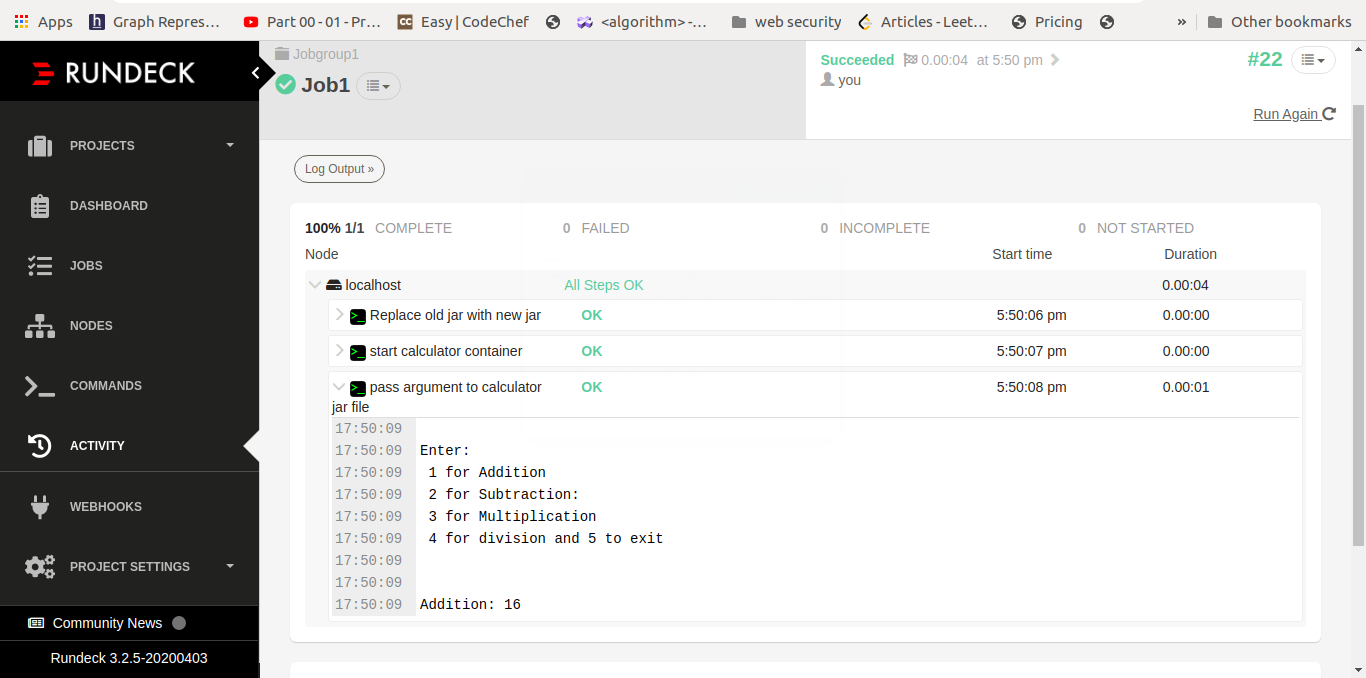
4. Job4: calculator deploy: -
This job will automatically trigger if the calculator test job is successfully executed and it will trigger the specified rundeck job.
Create a FreeStyle project and name it as a calculator deploy. Configuration of this step is as follows.
Rundeck instance: rundeck
Copy the job UUID in job identifier id in Post Build Actions → Rundeck
Create Pipeline View: -
Click on + icon and do following configuration
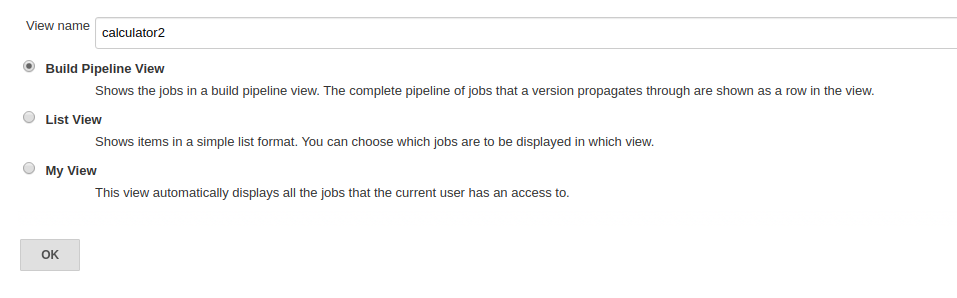
Click Ok and select calculator SCM as Initial Job under Pipeline Flow. Then click save.
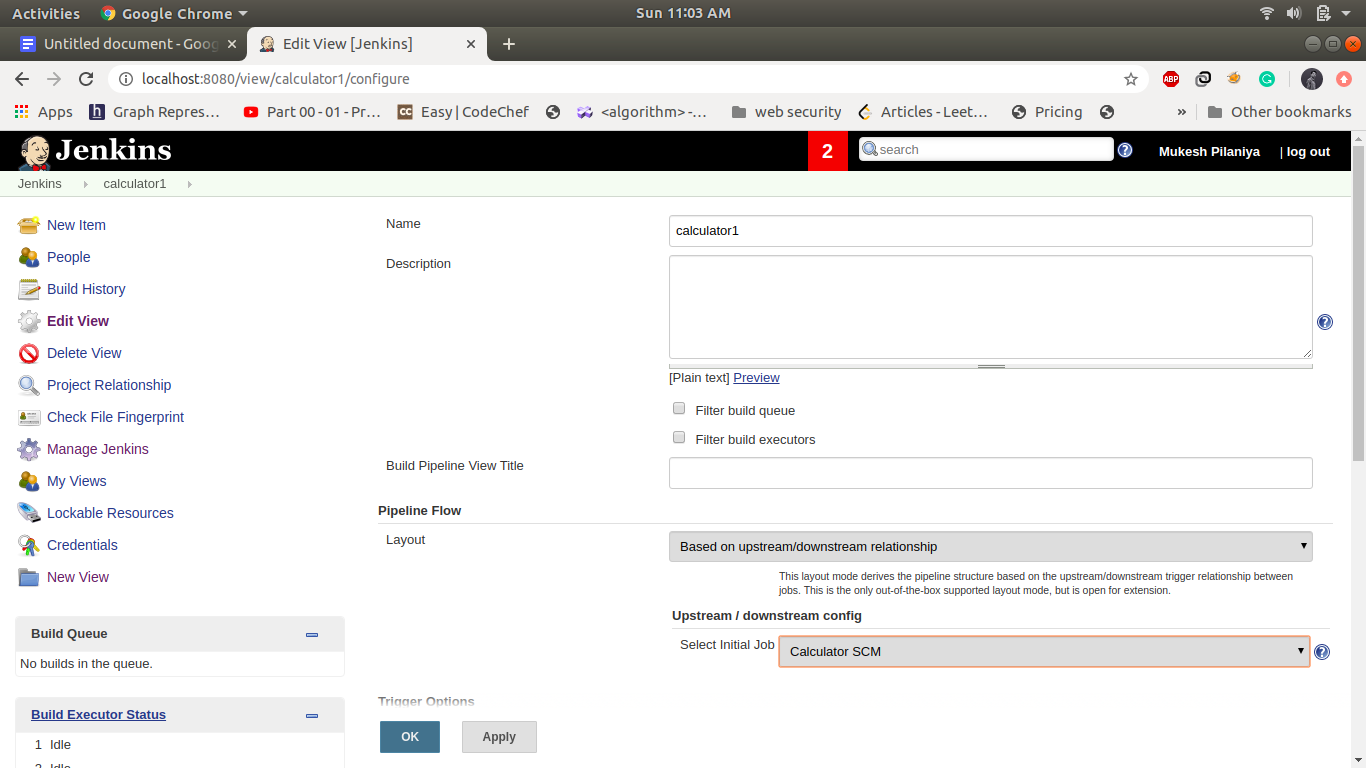
Pipeline View Layout: -
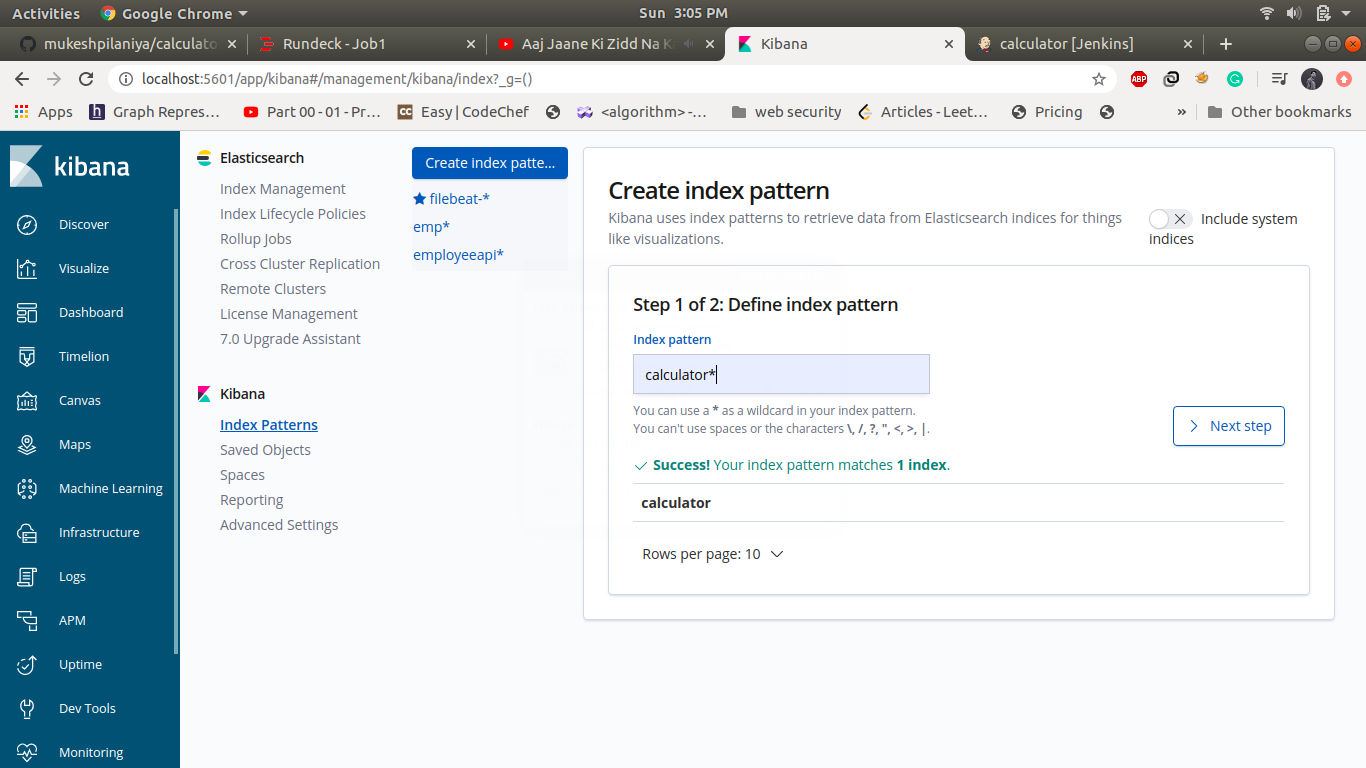
Create index in kibana and Visualize through graph: -
- Go to url http://localhost:5601
-
To create kibana index pattern navigate to Management->under kibana section choose index pattern and create new index pattern name as "calculator*". Click on next step and choose @Timestamp options
-
To see the log navigate to discover-> select calculator as index pattern
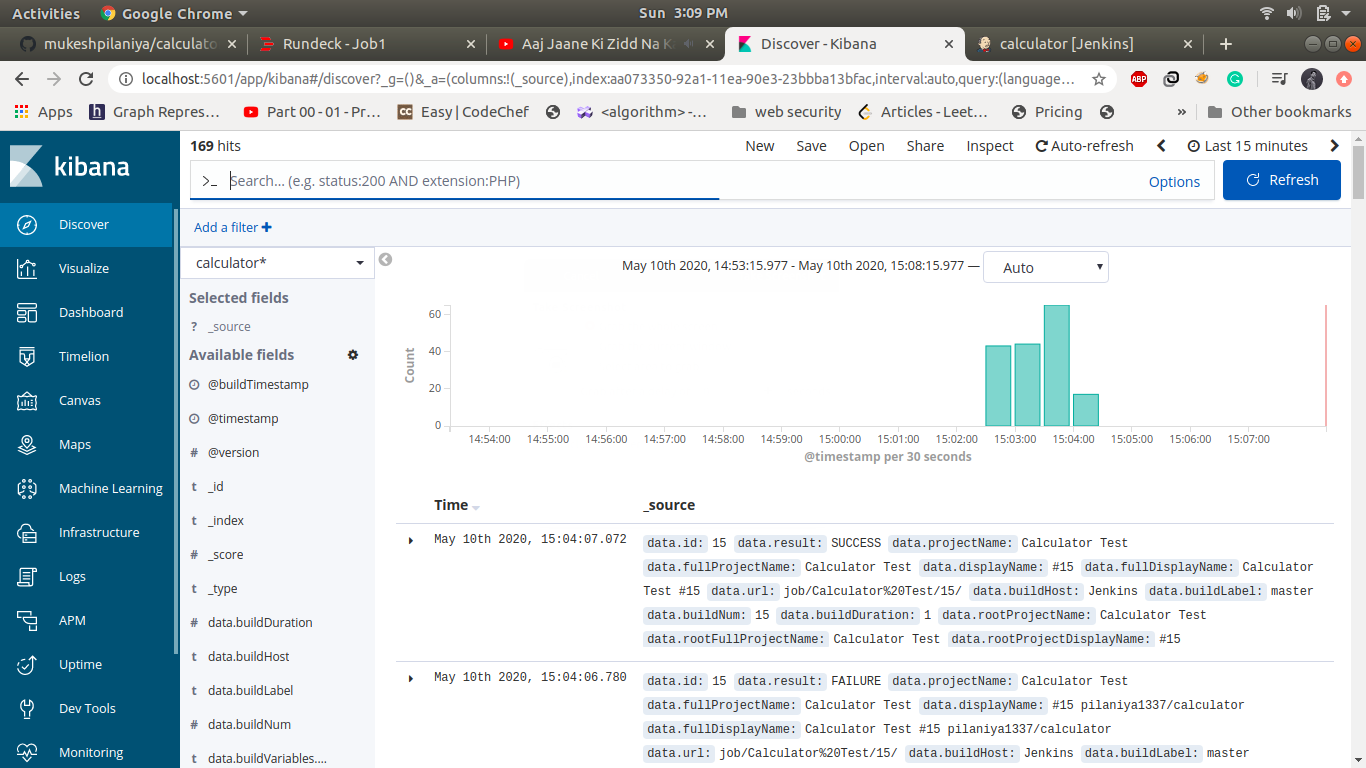
-
To visualize logs navigate to Visualize->click on + icon ->select one of map type->select calculator* index ->select appropriate fields->click on run->save ->name as calculator 1
Create 3-4 graph and save as calculator 1, calculator 2, calculator 3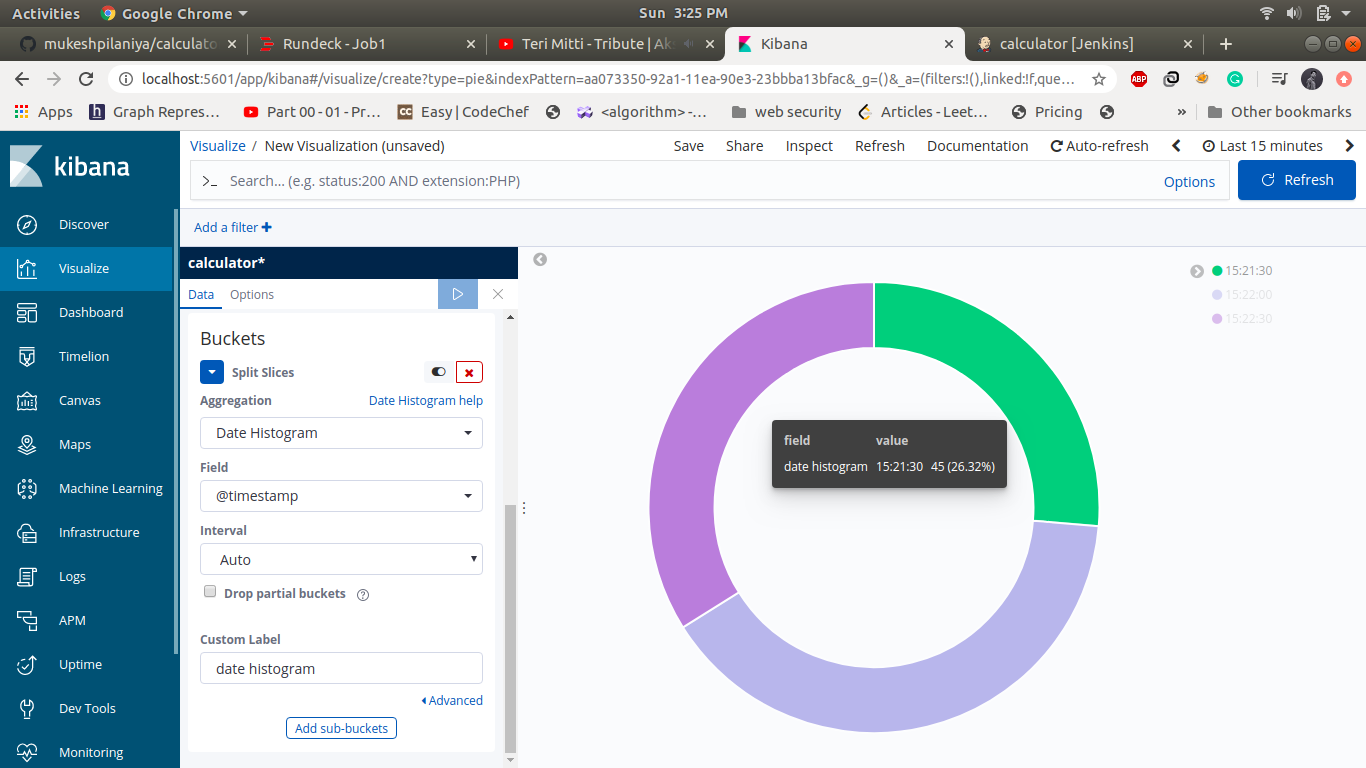
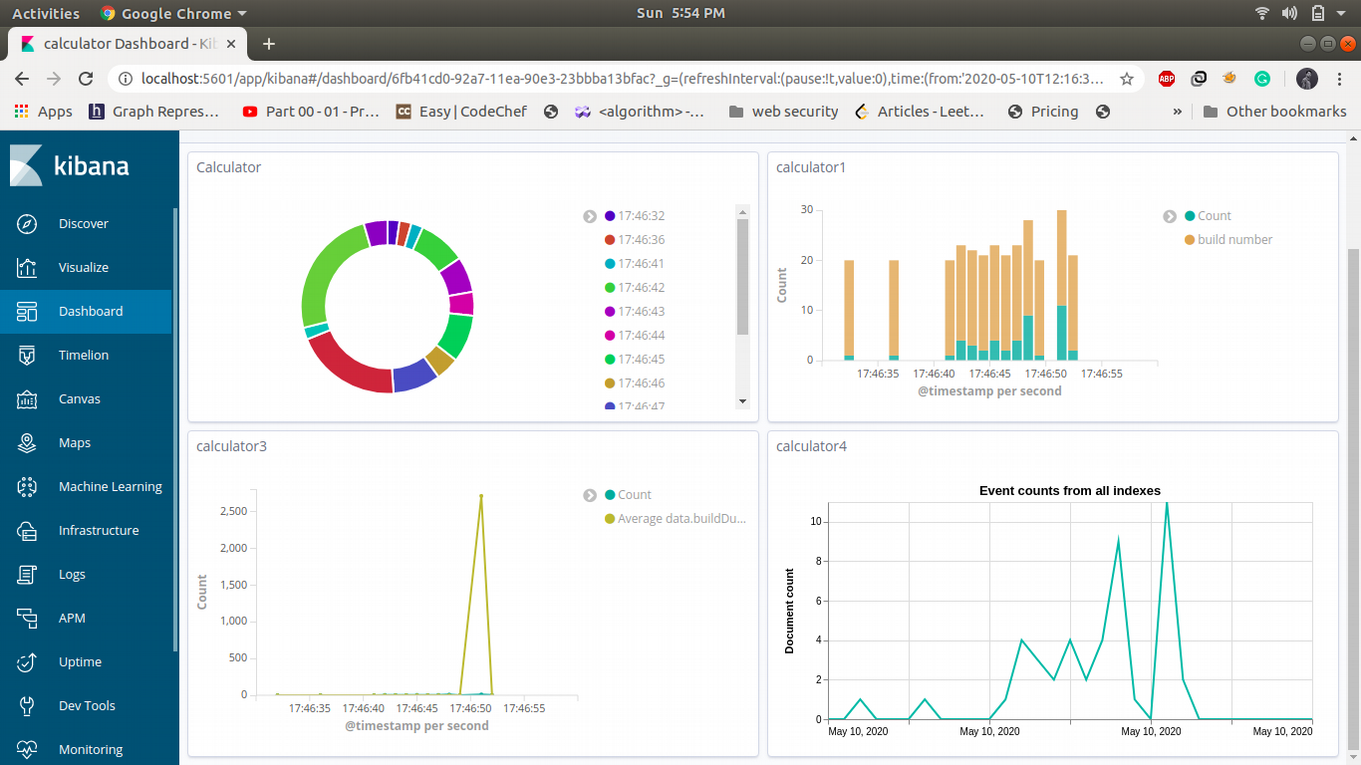
- To create a Dashboard of calculator, navigate to Dashboard >click on add->in search bar type calculator it will show calculator 1,2 and 3 select all of these and save the dashboard name as Calculator.
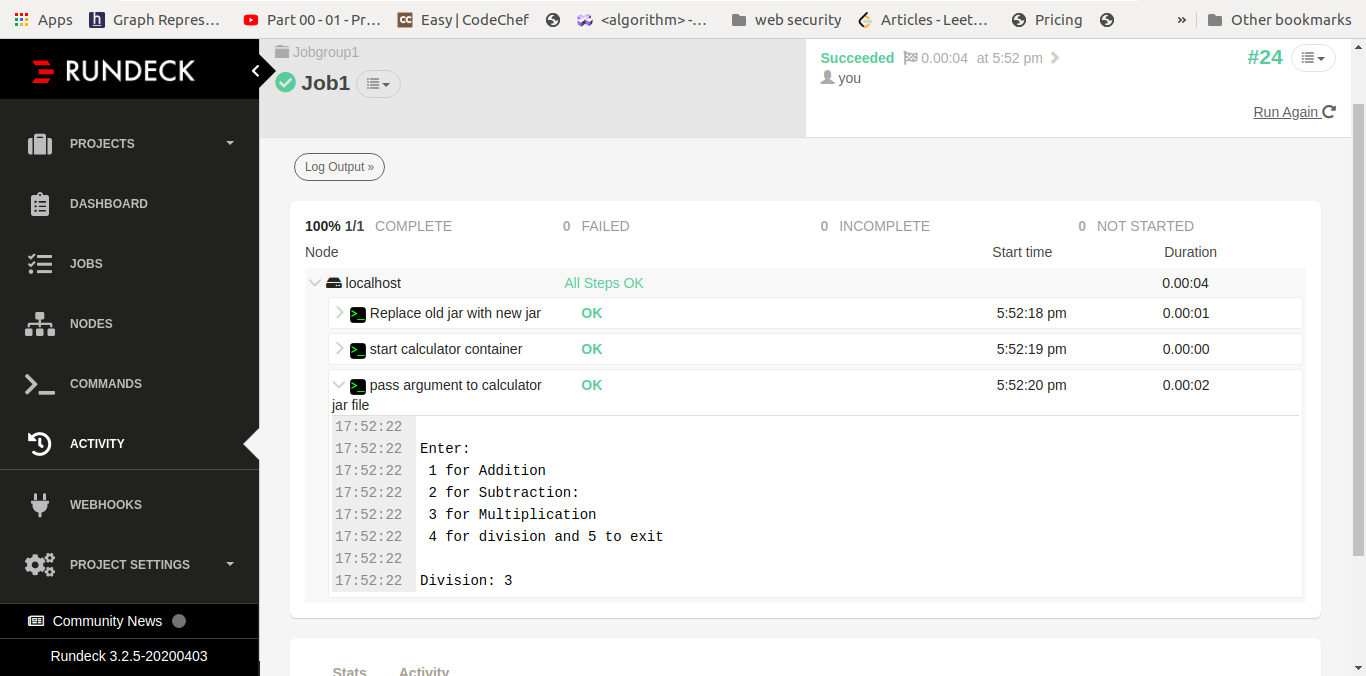
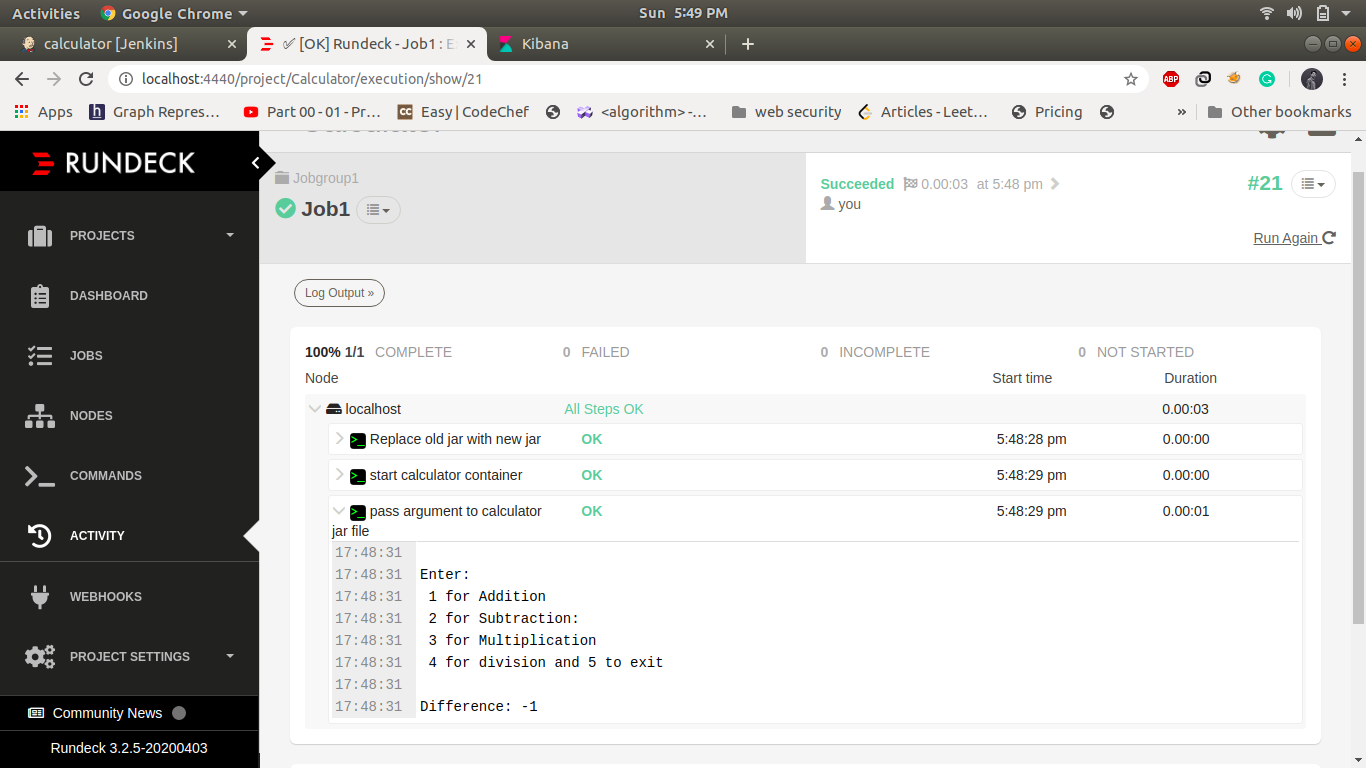
Results and execution: -
When new features are introduced in a project, then from its building, testing, deployment and monitoring is done in an automated manner.
We first write code for addition method and latter add subtract, multiplication and division method. output of each method as we added in our project code

Conclusion: -
DevOps tools help in automating the task of building, testing, releasing, deploying, operating and monitoring in a convenient and efficient way with enormous speed. Manual intervention prone to errors but automated environments are not. Data sharing techniques are used effectively to connect Devs with Ops.
References: -
[1] GitHub project: https://github.com/mukeshpilaniya/calculator
[2] DockerHub profile: https://hub.docker.com/u/pilaniya1337